

In this guide, we will walk through how to setup dbt Core in the cloud with Databricks. After you finish this guide, you will have the sample data provided uploaded to Databricks and run your first dbt command in the cloud.
Although the steps in this guide will specifically utilize Databricks, the steps can be modified slightly to work with any database that dbt supports. We also have guides made specifically for BigQuery, Redshift, and Snowflake.
If you would rather watch a video version of this guide, feel free to head over to YouTube. Let's jump right in!
- From the Databricks homepage, navigate to the left sidebar and select data. This will open up the sidebar to look at the data currently stored in Databricks.
- Click Create Table. This will take you to the Create New Table page.
- Under Files, click the box to browse your files and select
spi_matches_latest.csv.

- Click Create Table with UI
- Select Cluster to preview table. Click Preview Table. This will give you the ability to specify options for the table.

- Under Table Name, enter
stg_football_matches. - Under Create in Database, feel free to change to any database you like. We will use the default for simplicity's sake.
- Under File Type, make sure CSV is selected.
- Under Column Delimiter, make sure
,is in the box. - Check the box for First row is header.
- Check the box for Infer schema.
- Click Create Table. This will redirect to the table that you just created:

- Click Data on the left sidebar to open the data sidebar. Click Create Table.
- Repeat steps 3-12 with the following changes:
- Under Files, click the box to browse your files and select
spi_global_rankings.csv. - Under Table Name, enter
stg_football_rankings.
- Under Files, click the box to browse your files and select
- After repeating those steps with the indicated changes, your resulting page should look like this:

dbt Core Part 2 - Setting Up dbt on Github
Fork dbt Setup from GitHub
- Fork this repository. The repository contains the beginning state of a dbt project.
- Clone the repository locally on your computer.
- Open
dbt_project.ymlin your text editor.

dbt Project File Setup
- Change the project name to
soccer_538. - Change the profile to
soccer_538. - Change model name to
soccer_538. - Under the soccer_538 model, add a
stagingandmartsfolder that are both materialized as views. - Save your changes.

Profile Setup
- Open
profiles.yml. - Update the file to this and change the schema to use your name and the http path.:
soccer_538:
    target: dev
    outputs:
        dev:
          type: databricks
          schema: dbt_jack_sparrow
          host: "{{ env_var('databricks_host') }}"
          http_path: /sql/your/http/path
          token: "{{ env_var('databricks_token') }}"
- Create a new file in your root directory of your dbt project called
execute_dbt.py. - Paste this code block for the content of execute_dbt.py:
import subprocess
import os
import json

dbt_command = os.environ.get('dbt_command', 'dbt run')

subprocess.run(['sh', '-c', dbt_command], check=True)
- Commit and push your changes to Github.
Now that we have our sample data and dbt processes setup, we need to write our example models for the dbt job to run.
dbt Models
- Navigate into the models folder in your text editor. There should be a subfolder under models called
example. Delete that subfolder and create a new folder called538_football. - Create two subfolders inside
538_footballcalledstagingandmarts.

- Inside the staging folder, create a file called stg_football_matches.sql.
- Paste the following code into that file:
select * fromdefault.stg_football_matches - Inside the staging folder, create a file called
stg_football_rankings.sql - Paste the following code into that file:
select * fromdefault.stg_football_rankings - In the staging folder, add a file called
schema.yml. - In this file, paste the following information:
version: 2

models:
  - name: stg_football_matches
    description: Table from 538 that displays football matches and predictions about each match.

  - name: stg_football_rankings
    description: Table from 538 that displays a teams ranking worldwide
- In the marts folder, create a file called
mart_football_information.sql. - Paste the following code into that file:
with
  qryMatches as (
    SELECT * FROM {{ ref('stg_football_matches') }} where league = 'Barclays Premier League'
    ),
  qryRankings as (
    SELECT * FROM {{ ref('stg_football_rankings') }} where league = 'Barclays Premier League'
  ),

  qryFinal as (
    select
      qryMatches.season,
      qryMatches.date,
      qryMatches.league,
      qryMatches.team1,
      qryMatches.team2,
      team_one.rank as team1_rank,
      team_two.rank as team2_rank
    from
      qryMatches join
      qryRankings as team_one on
        (qryMatches.team1 = team_one.name) join
      qryRankings as team_two on
        (qryMatches.team2 = team_two.name)
  )

select * from qryFinal
- In the marts folder, add a file called
schema.yml - In this file, paste the following:
version: 2

models:
  - name: mart_football_information
    description: Table that displays football matches along with each team's world ranking.
- Save the changes.
- Push a commit to Github.
We are ready to move into Shipyard to run our process. First, you will need to create a developer account.
dbt Core Part 3 - Setting Up dbt on Shipyard
Create Developer Shipyard Account
- Navigate to Shipyard's sign-up page here.

- Sign up with your email address and organization name.
- Connect to your Github account by following this guide. After connecting your Github account, you'll be ready to create your first Blueprint.
Creating dbt Core Blueprint
- On the sidebar of Shipyard's website, click Blueprints.
- Click Add Blueprint on the top right of your page.
- Select Python.
- Under Blueprint variables, click Add Variable.
- Under display name, enter
dbt CLI Command. - Under reference name, enter
dbt_command. - Under default value, enter dbt run.
- Click the check box for required
- Under placeholder, enter
Enter the command for dbt. - Click Next
- Click Git.

- Select the repository where your dbt files sit.
- Click the source that you want the files pulled from. Generally main or master.
- Under file to run, enter
execute_dbt.py. - Under Git Clone Location, select the option for Unpack into Current Working Directory.
- Click Next Step on the bottom right of the screen.
- Next to Environment Variable, click the plus sign to add an environment variable.
Add Environment Variables
The environment variables that need to be added will vary based on the cloud database that you use. Please click your database below to continue:
| Variable Name | Value |
|---|---|
| DBT_PROFILES_DIR | . |
| databricks_host | host from databricks |
| databricks_token | token from databricks |
Python Packages
- Click the plus sign next to Python Packages.
- In the Name field, enter dbt-databicks. In the version field, enter
==1.0.0. - Click Next.
Blueprint Settings
- Under Blueprint Name, enter
dbt - Execute CLI Command. - Under synopsis, enter
This Blueprint runs a dbt core command. - Click Save.
- In the top right of your screen, click Use this Blueprint. This will take you over to the Fleet Builder and prompt you to select a project.
Build dbt Core Fleet
- On the Select a Project prompt, click the drop down menu to expand it and select
Create a New Project. - Under project name, enter
dbt Core Testing. - Under timezone, enter your timezone.

- Click Create Project.
- Select dbt Core Testing and click Select Project. This will create a new Fleet in the project. The Fleet Builder will now visible with one Vessel located inside of the Fleet.
- Click on the Vessel in the Fleet Builder and you will see the settings for the Vessel pop up on the left of your screen.

- Under Vessel Name, enter
dbt Core CLI Command. - Under dbt CLI Command, enter
dbt debug. - Click the gear on the sidebar to open Fleet Settings.

- Under Fleet Name, enter
dbt Core. - Click Save & Finish on the bottom right of your screen.
- This should take you to a page showing that your Fleet was created successfully.

- Click Run Your Fleet. This will take you over to the Fleet Log.

- You can click on the bar to get the output from your run.
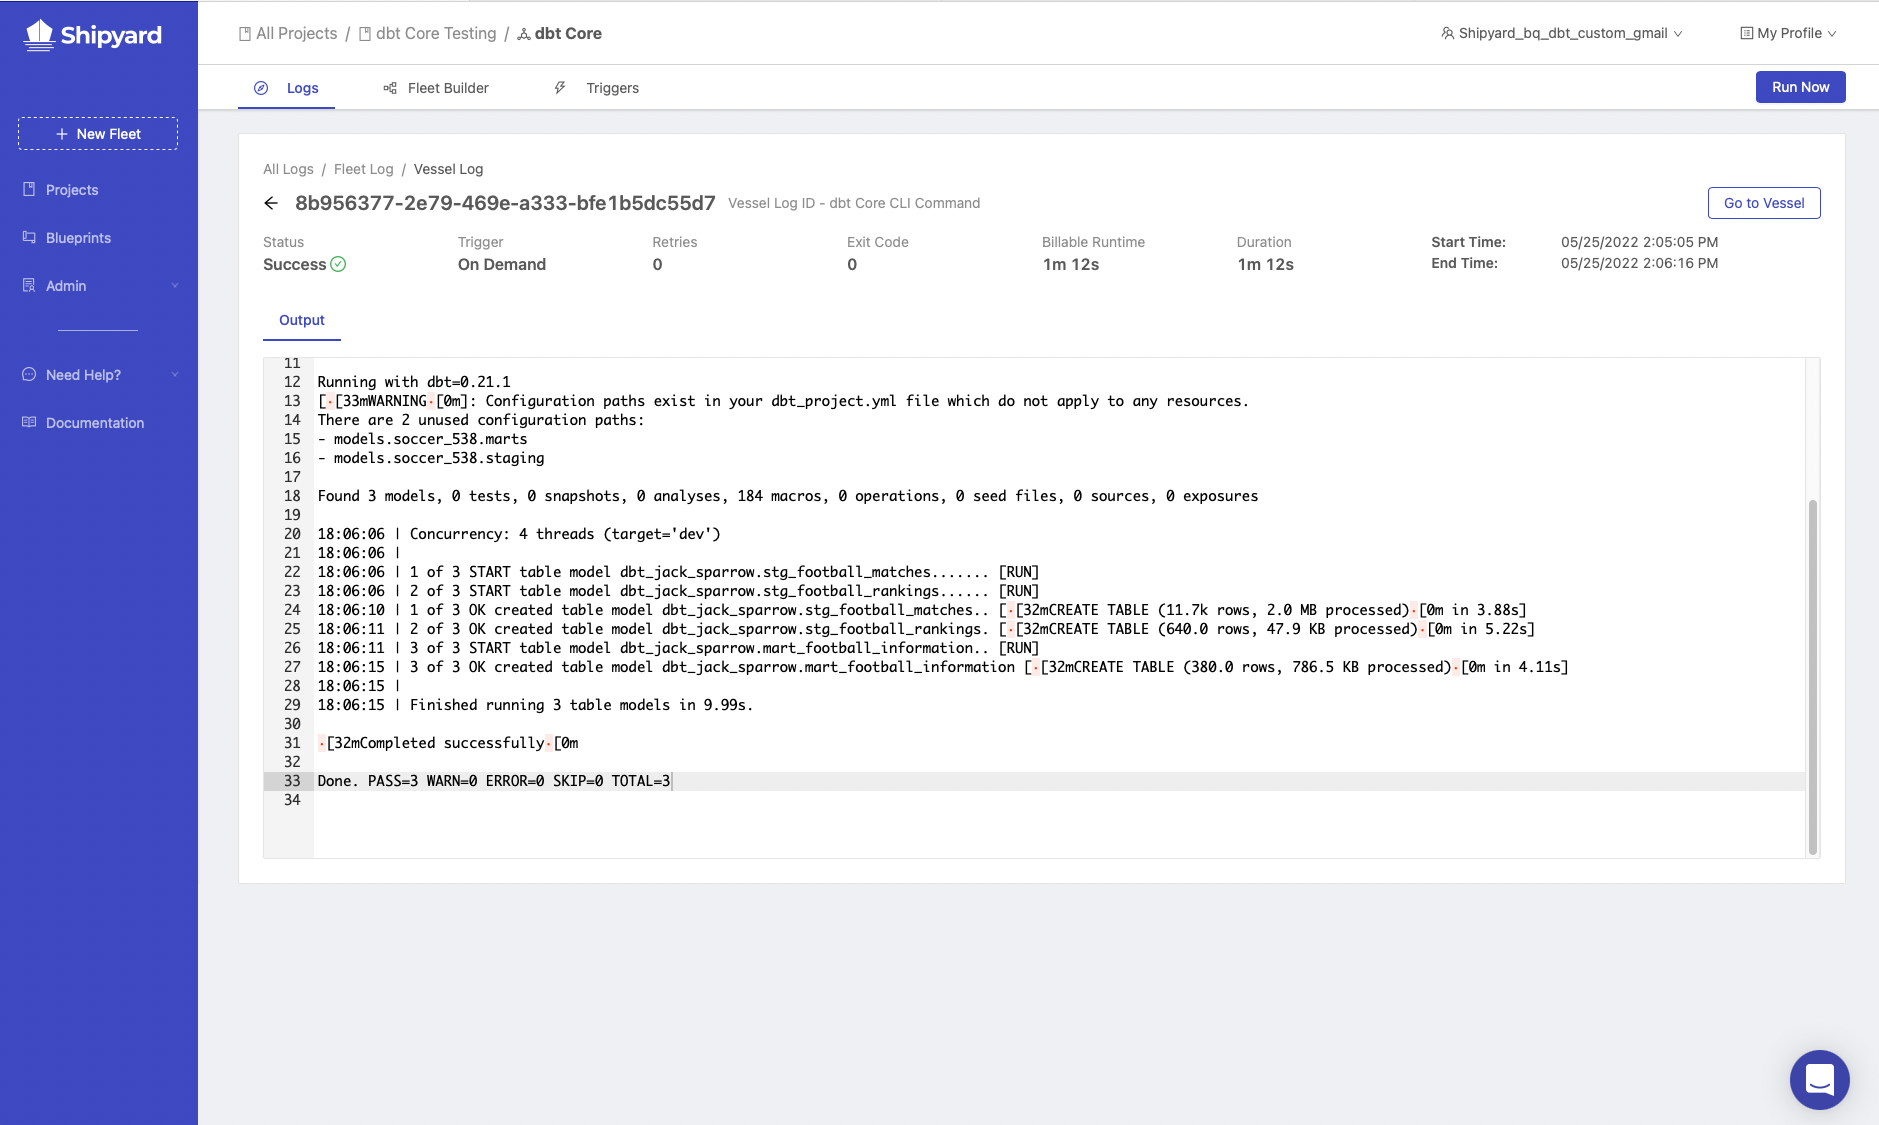
If you scroll to the top of the output, you will see that the environment variables that were put in during the Blueprint creation process are hidden from the user.

If dbt debug succeeds, we are ready to move into part three of the guide. If it fails, please go back to the steps above and make sure everything is setup correctly. Feel free to send an Intercom message to us at anytime using the widget on the bottom right of the Shipyard screen.
In the meantime, please consider subscribing to our weekly newsletter, "All Hands on Data." You'll get insights, POVs, and inside knowledge piped directly into your inbox. See you there!


